Service Manager powered by HEAT
Configuring Request Offering Access
•About Configuring Request Offering Access
•Configuring Access Rights by User Properties
•Setting the Organizational Unit Access
•Example: Setting Access by Location
About Configuring Request Offering Access
You can determine who can access and edit a request item when you publish a request offering.
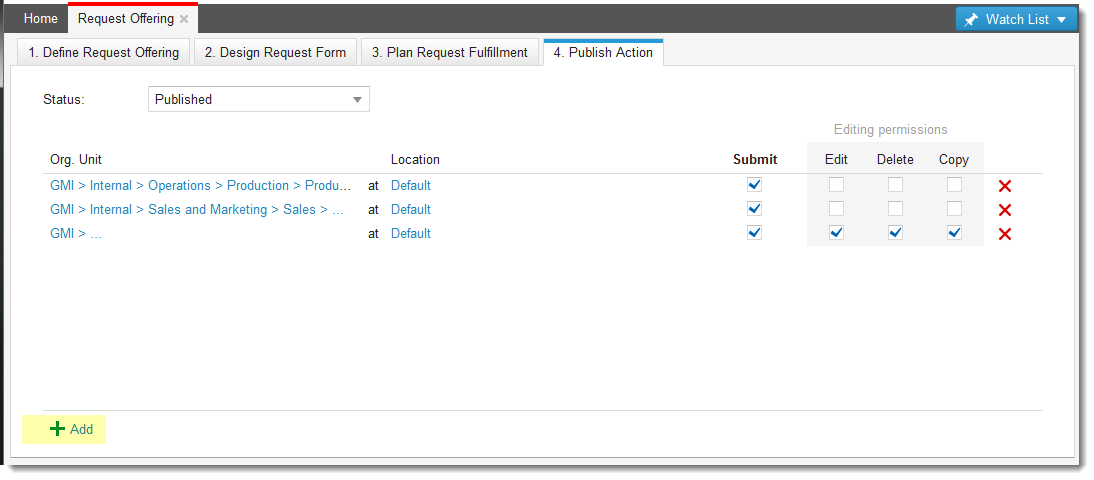
From the request offering 4. Publish Action page, set access by organizational unit and by location.
Request Offering Publish Action Page

•A default location allows all locations to see and submit the service request.
•The request offering owner always has full access to the service request, even if their location or organizational unit has none.
•Only a service owner can edit a request offering, and must be included in the designated organizational unit and location.
Configuring Access Rights by User Properties
•About Configuring Access Rights
•About Configuring Relationships
•Example: Configuring Access for a Team
About Configuring Access Rights
Administrators can configure access rights based on user properties by using the Configure Access workspace. These properties control which request offerings are available to Service Catalog users. After you add a property, the system updates the Publish Action Access tab of the request offering, to allow you to use the filters.
You can configure access to a request offering by multiple properties such as department, location, and organizational unit, or simply by department or team. Configuring access by team gives access rights to members of a specific team regardless of their department, organizational unit, or location.
The system displays any rights or access added through this function on any new request offerings created after making the access changes. Rights assigned through this function appear on, but should not affect, rights for existing request offerings. The owner of the request offering template retains all rights, regardless of the settings in the Configure Access workspace.
The examples below show how to add and configure team access, but you can add department or any other business object access based on your requirements. The example also depicts how request offerings may be impacted after the configurations are complete.
About Configuring Relationships
To configure access rights, the Employee and Access business objects must contain relationships to the business object you use. By default, the system includes relationships to the Org Unit business object and the Location business object. The Org Unit filtering property is a default, therefore it cannot be deleted, nor can the Relationship for this property be changed.
You must manually add relationships to other business objects, such as Department or Team to the Access business object. However, you must first check that the relationships to corresponding business objects are configured for the Employee and Access (ServiceReqTemplateEntityAccess) business objects. You may need to set up validation lists for team or department before you can use them to configure user access rights. Ensure that you know the name of the validation list since you may need to select it later.
The Edit Access Object and Edit Employee Object buttons in the Configure Access workspace take you directly to the Access and Employee business objects respectively. Click the Relationship tab to check the relationships or the Fields tab to check the default field settings.
After you have created the relationships, you can add the new access properties.
Configuring Access Rights
1.From the Configuration Console, click Build > Self Service > Configure Access to open the Configure Access workspace.
The system displays the following toolbar buttons:
Configure Access Toolbar

2.Click Add Filtering Property to open the Create Filtering Property dialog box.
3.Enter the following information:
| Field Name | Description |
|---|---|
| Title | The title. The title displays in the Configuration Console and in the request offering on the Publish Action page. See the following example. |
| Relationship |
The relationship. Select a relationship configured on the business object, that is used to filter access rights. For example, select ServiceReqTemplateEntityAccessAssocDepartment or ServiceReqTemplateEntityAccessAssocStandardUserTeam. |
| Validation List | A relationship requiring a validation list displays the values available. This option does not appear for relationships that do not require a validation list. |
| Employee relationship |
Select a relationship from the Employee business object. For example, select DepartmentAssocProfileEmployee or StandardUserTeamAssociatedProfileEmployee. |
| Allow Multiple Selection |
Allows multi-select options on the associated validation list; otherwise you can select only one option. For example, if you use a validation list such as Department or Team, you can select multiple departments or teams when configuring access. These global settings can later be changed from within the request offering. |
4.Once the configuration is complete, set the request and offering permissions. These apply to request offerings and are default settings.
Request Permissions: Allows the configured users to submit, edit, or cancel a service request based on a request offering template.
Offering Permissions: Allows the configured users to edit, delete, or copy the service request based on a request offering template.
The following table provides a brief explanation of the options:
| Option | Description |
|---|---|
| Submit | Specifies if users in this organizational node and location can submit a service request based on this offering. |
| Edit | Specified if users in this organizational node and location can modify a service request record based on this offering. |
| Cancel | Specifies if users in the selected organization node and location can cancel a service request they submitted. |
| Delete | Specifies if users can delete a service request record based on this offering. |
| Copy | Specifies if users can duplicate the service request record based on this offering. |
Only service owners can edit, delete, or copy a request offering.
5. You can edit, copy, or delete an existing access configuration (filtering property) by clicking the copy icon or the delete icon.
6.Click Save.
Note that request offerings mirror the settings that you created through this function. See the examples below.
Edited Configure Access Page with Both Team and Department Added as Options

Request Offering Page Mirroring the Changes Made through the Configure Access Workspace

Example: Configuring Access for a Team
A company wants to set up access to certain service requests (request offerings) based on team membership. The following process walks through the steps needed to edit the Access business object to add this as a configurable option in the Configure Access workspace.
1.Ensure that the Team relationship is available to the Employee business object.
| a. | From the Configure Access workspace, click Edit Employee Object. |
| b. | Click the Fields tab. |
| c. | Click Team to go to the Fields > Team workspace. |
| d. | Ensure that Validated is checked and that the name of the pick list used is Team Of StandardUserTeam. |
| e. | Click the Relationships tab. |
| f. | Ensure that the Team relationship exists. The system displays it as ProfileEmployeeAssociatedByStandardUserTeam. |
2.Ensure that the Team relationship is available to the Access business object.
| a. | From the Configure Access workspace, click Edit Access Object. |
| b. | Click the Relationships tab. |
| c. | Click Add new.... |
| d. | Click StandardUserTeam. |
| e. | Copy the value in the Display Name field and paste it into the Internal Reference Name field. (Save this information as you will need it later when you select the team relationship for configuring access.) |
| f. | Under the This Business Object header, click Zero or Many. |
| g. | Under the StandardUserTeam heading, click Zero or Many. |
| h. | At the bottom of the page, click Add This Relationship. |
| i. | Click Save. |
3.Return to the Configure Access workspace to add the Team business object as a configuration.
| a. | Click Add Filtering Property. |
| b. | In the Create Filtering Property dialog box, enter values as described in step 3 of Configuring Access Rights by User Properties. |
| c. | Click OK. |
| d. | Ensure that Team is listed as a filtering property in the Configure Access workspace. |
4.Configure access for this filtering property by doing the following:
| a. | Click Any to see the team list and click to select the teams that will have default access rights. |
| b. | Set request offering permissions and offering permissions as described in step 4 of Configuring Access Rights by User Properties. |
Setting the Organizational Unit Access
•The organizational unit for a user is defined in the Employee record.
•Offerings defined for a specific node are also visible to their parent node.
•You can publish to a specific node and not include subtrees.
1.Log in to the application as a service owner.
2.Open a request offering.
3.Click the 4. Publish Action tab.
4.Click the add icon  at the bottom of the page.
Adding an Organizational Unit to a Request Offering
The Select Organizational Unit window appears.
5.Select the node for which to enable access. For example, select Marketing. Check Include Sub Tree to include child nodes.
Selecting the Organizational Unit Node
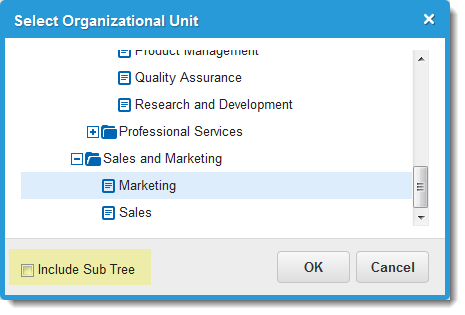
The users with access to this example are: Sales and Marketing, Marketing, administrators, and the owner of this offering.
6.Click OK.
Example: Setting Access by Location
Setting access by location gives you more flexibility and allows you to manage the request offering in finer detail.
•The location is determined by the Location field in the Employee record.
•The offering owner still has access, no matter their location.
•A location set to default gives access to all locations.
•Users in a lower location level have access to the offering.
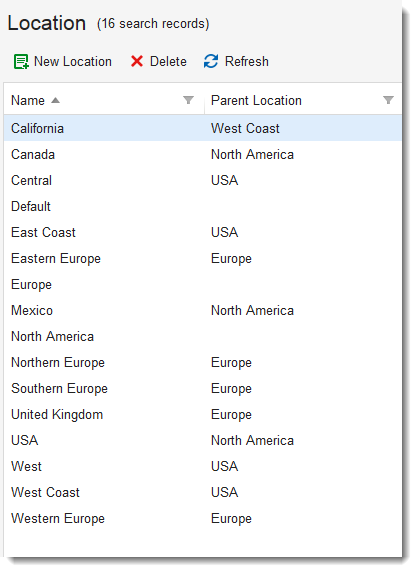
For example, if you have the following locations defined:
Defined Locations
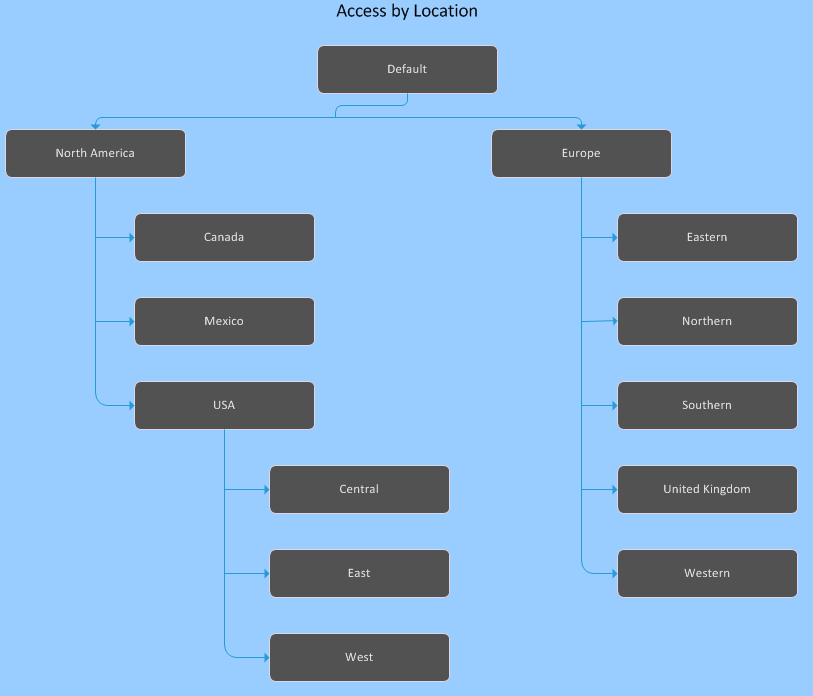
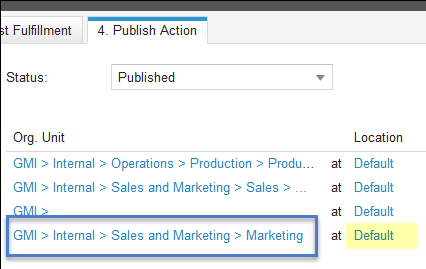
Then it might look like this:
Access by Location
Or in the Select Locations window:
Select Locations Window
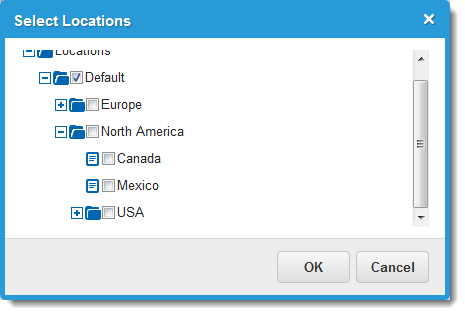
If the location North America is selected, then all users in North America, Canada, Mexico, and all child locations have access. Users in Europe do not have access to this request offering.
1.Log in to the application as a service owner.
2.Open a request offering.
3.Click the 4. Publish Action tab.
4.Click Default in the location column next to the organizational unit to define.
Click Default under Location
The Select Locations window appears.
5.Uncheck Default, then check locations. For example, check USA.
Select Location USA
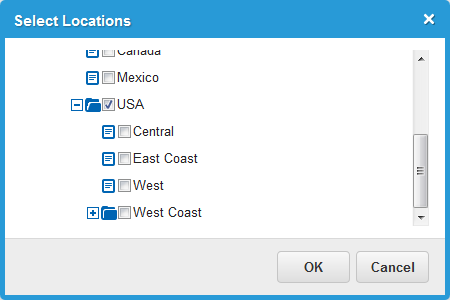
This enables access to all USA users, including users in child locations.
6.Click OK.
7.Set the status to published.
8.Click Save or Save & Exit.
Was this article useful?
The topic was:
Inaccurate
Incomplete
Not what I expected
Other
Copyright © 2017, Ivanti. All rights reserved.